It’s already snowed twice in Salt Lake City. Winter seems to be upon us, here in the Northern Hemisphere. And even if it wasn’t, I suppose there’s some truth to the idea that it’s always snowing somewhere.
So what better time to make an attempt at eradicating those lame 4- or 8-pointed paper snowflakes that seem to pop up at this time of year as decorations in windows, in cubicles, on Christmas trees, and hanging from ceilings across this great nation?
In case you weren’t aware (and Stephenie Meyer for one apparently isn’t), snowflakes have six points. Always. (Unless they’re broken or deformed by atmospheric conditions.) The crystalline structure of water is hexagonal. That means six-sided. The rare snowflake may be found with only three sides or points, but water simply does not freeze into 4-sided crystals.
Common sheets of paper, however, do come in 4-sided forms. And these sheets of paper fold easily into shapes that when cut will produce (said lame) 4- or 8-pointed snowflakes. But really, it’s not as difficult as you might think to fold them into a shape that will help you cut a 6-pointed snowflake. Really. Let’s try it:
Step 1:
Take a sheet of 8½ × 11 rectangular white paper (see Fig. 1).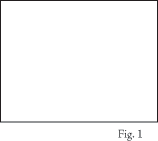
Fold one corner down so that the shorter edge of the paper meets the longer edge of the paper (see Fig. 2) and crease the paper along the fold.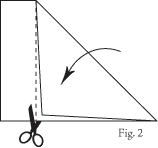
Cut off the part of the sheet that isn’t folded against itself, leaving a triangular folded shape. (If you were to unfold the paper at this point, you would have a square instead of the rectangle you started with.)
Step 2:
Fold your triangle in half, so that it makes a smaller triangle of the same shape (Fig. 3).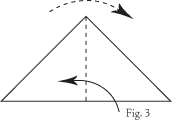
This triangle has one longer side (the hypotenuse) and two shorter sides of the same length. (For those who care, it is a 45-45-90 isosceles right triangle.) When you folded your triangle in half, you may have ended up with one of the shorter sides at the bottom (see Fig. 4.1). If so, rotate your triangle so that the hypotenuse is at the bottom, or closest to you (see Fig. 4.2).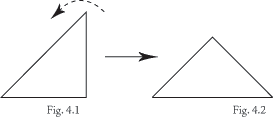
Step 3:
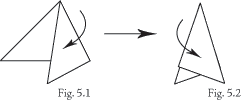
The point of the triangle formed by the two short sides should now be facing away from you. Visualize a line from that point straight down to the longest side. Fold one corner past that imaginary line until the edge of the paper is about 25% of the way between that imaginary line and the opposite corner (see Fig. 5.1). Before creasing the paper, fold the opposite corner in the same way, and make sure that the edges of the paper meet symmetrically so that the finished shape is in a kind of Star-Trek communicator-type chevron (see Fig 5.2).
Step 4:
This is the fun part. (At this point, the procedures for 4-pointed snowflakes and 6-pointed snowflakes merge.) Cut the tips of the chevron off the bottom at a sharp angle to create the points (or at a milder angle to create sides) of your snowflake. Cut off the tip of the resulting cone to make a hole in the center of your snowflake. Cut various wedges, arcs, circles, and other shapes into the sides of the cone, making sure never to cut all the way through the cone to the other side. Have fun!
Tip: to rid your paper snowflake of creases (and stiffen the paper) before displaying it, spray it with a bit of starch and iron it between two other sheets of paper or cloth.
This blog entry Copyright © 2008 Carol Hopper — All Rights Reserved.